Saturday, 23 June 2018

Sewn Boiled Paper Book

If you have read the previous post you know how the following beautiful book pages came to be, this post is all about the sewing and decoration process.
I also noticed that all my pictures turned out way too big for my blog layout so I am reducing the size, hopefully not loosing any of the details.

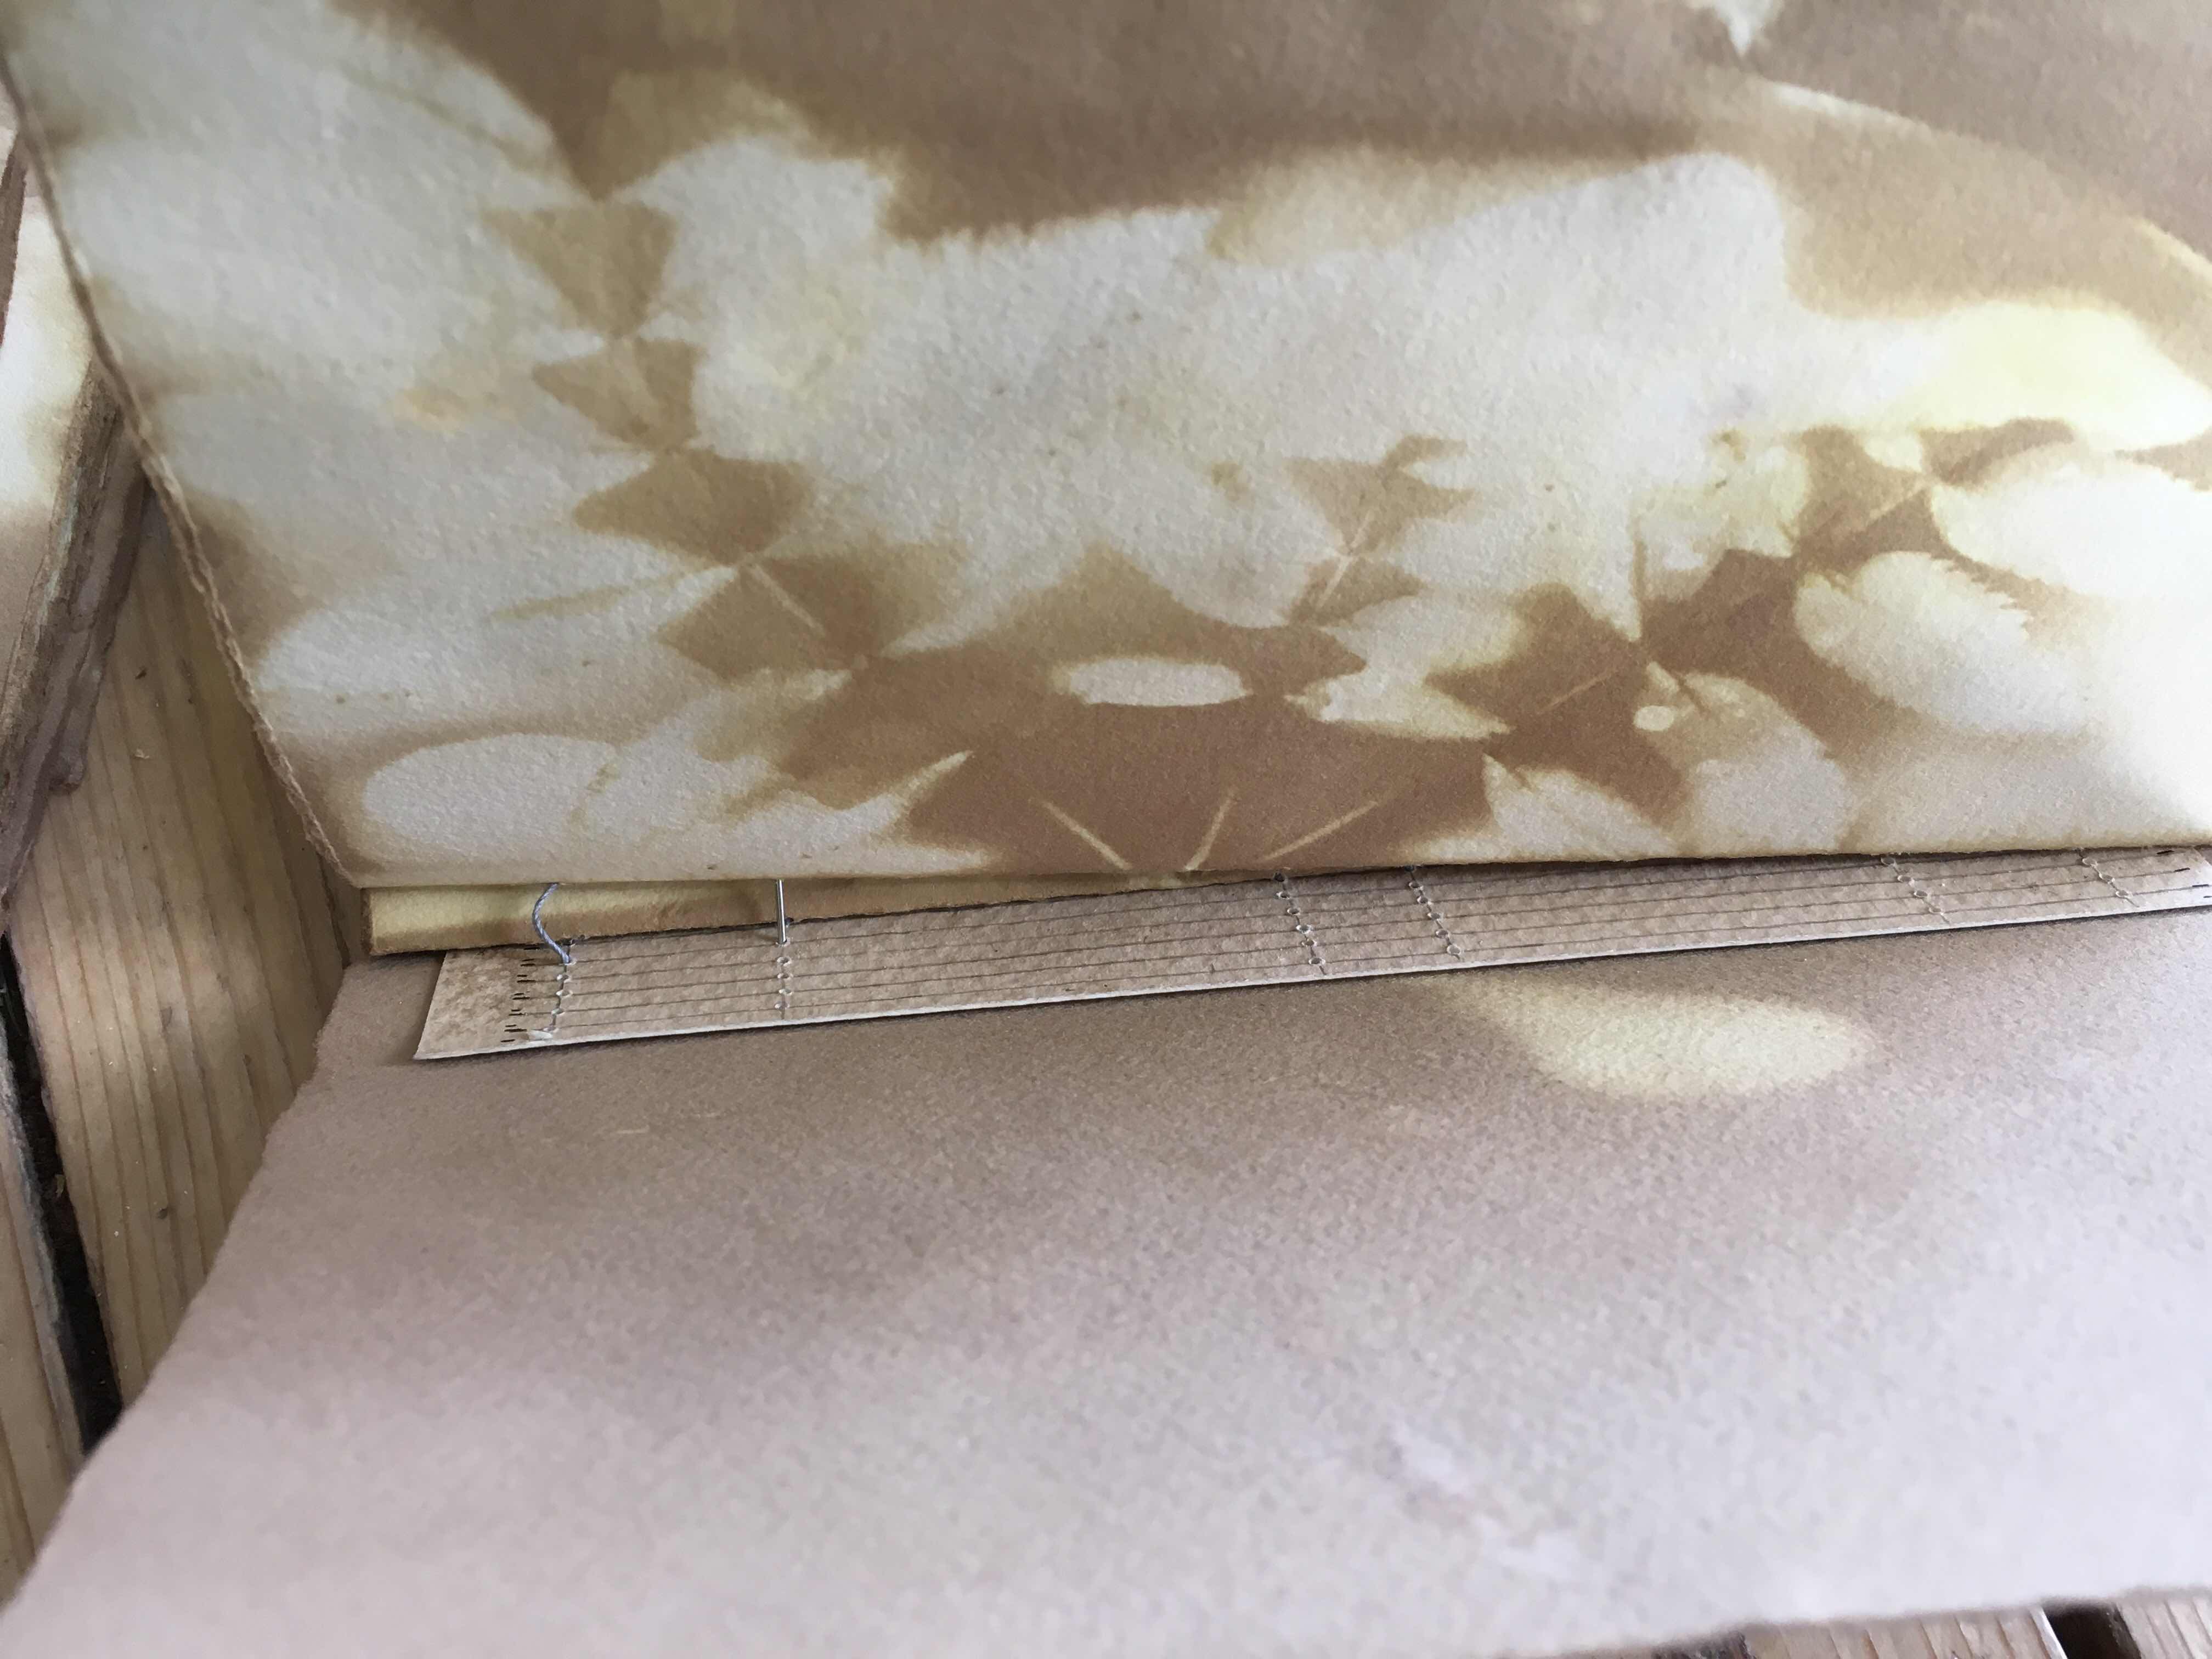
The following pictures show the holes in the folio (a single page is a folio, a few pages together are a signature) and also in the inner spine of the book cover. I wanted to give the spine a little extra stability and glued an extra piece of sturdy paper inside. I then used a dremel type of handheld drill to make the holes in the cover and in the folios, the watercolour paper is just a little too thick for a needle to go through.


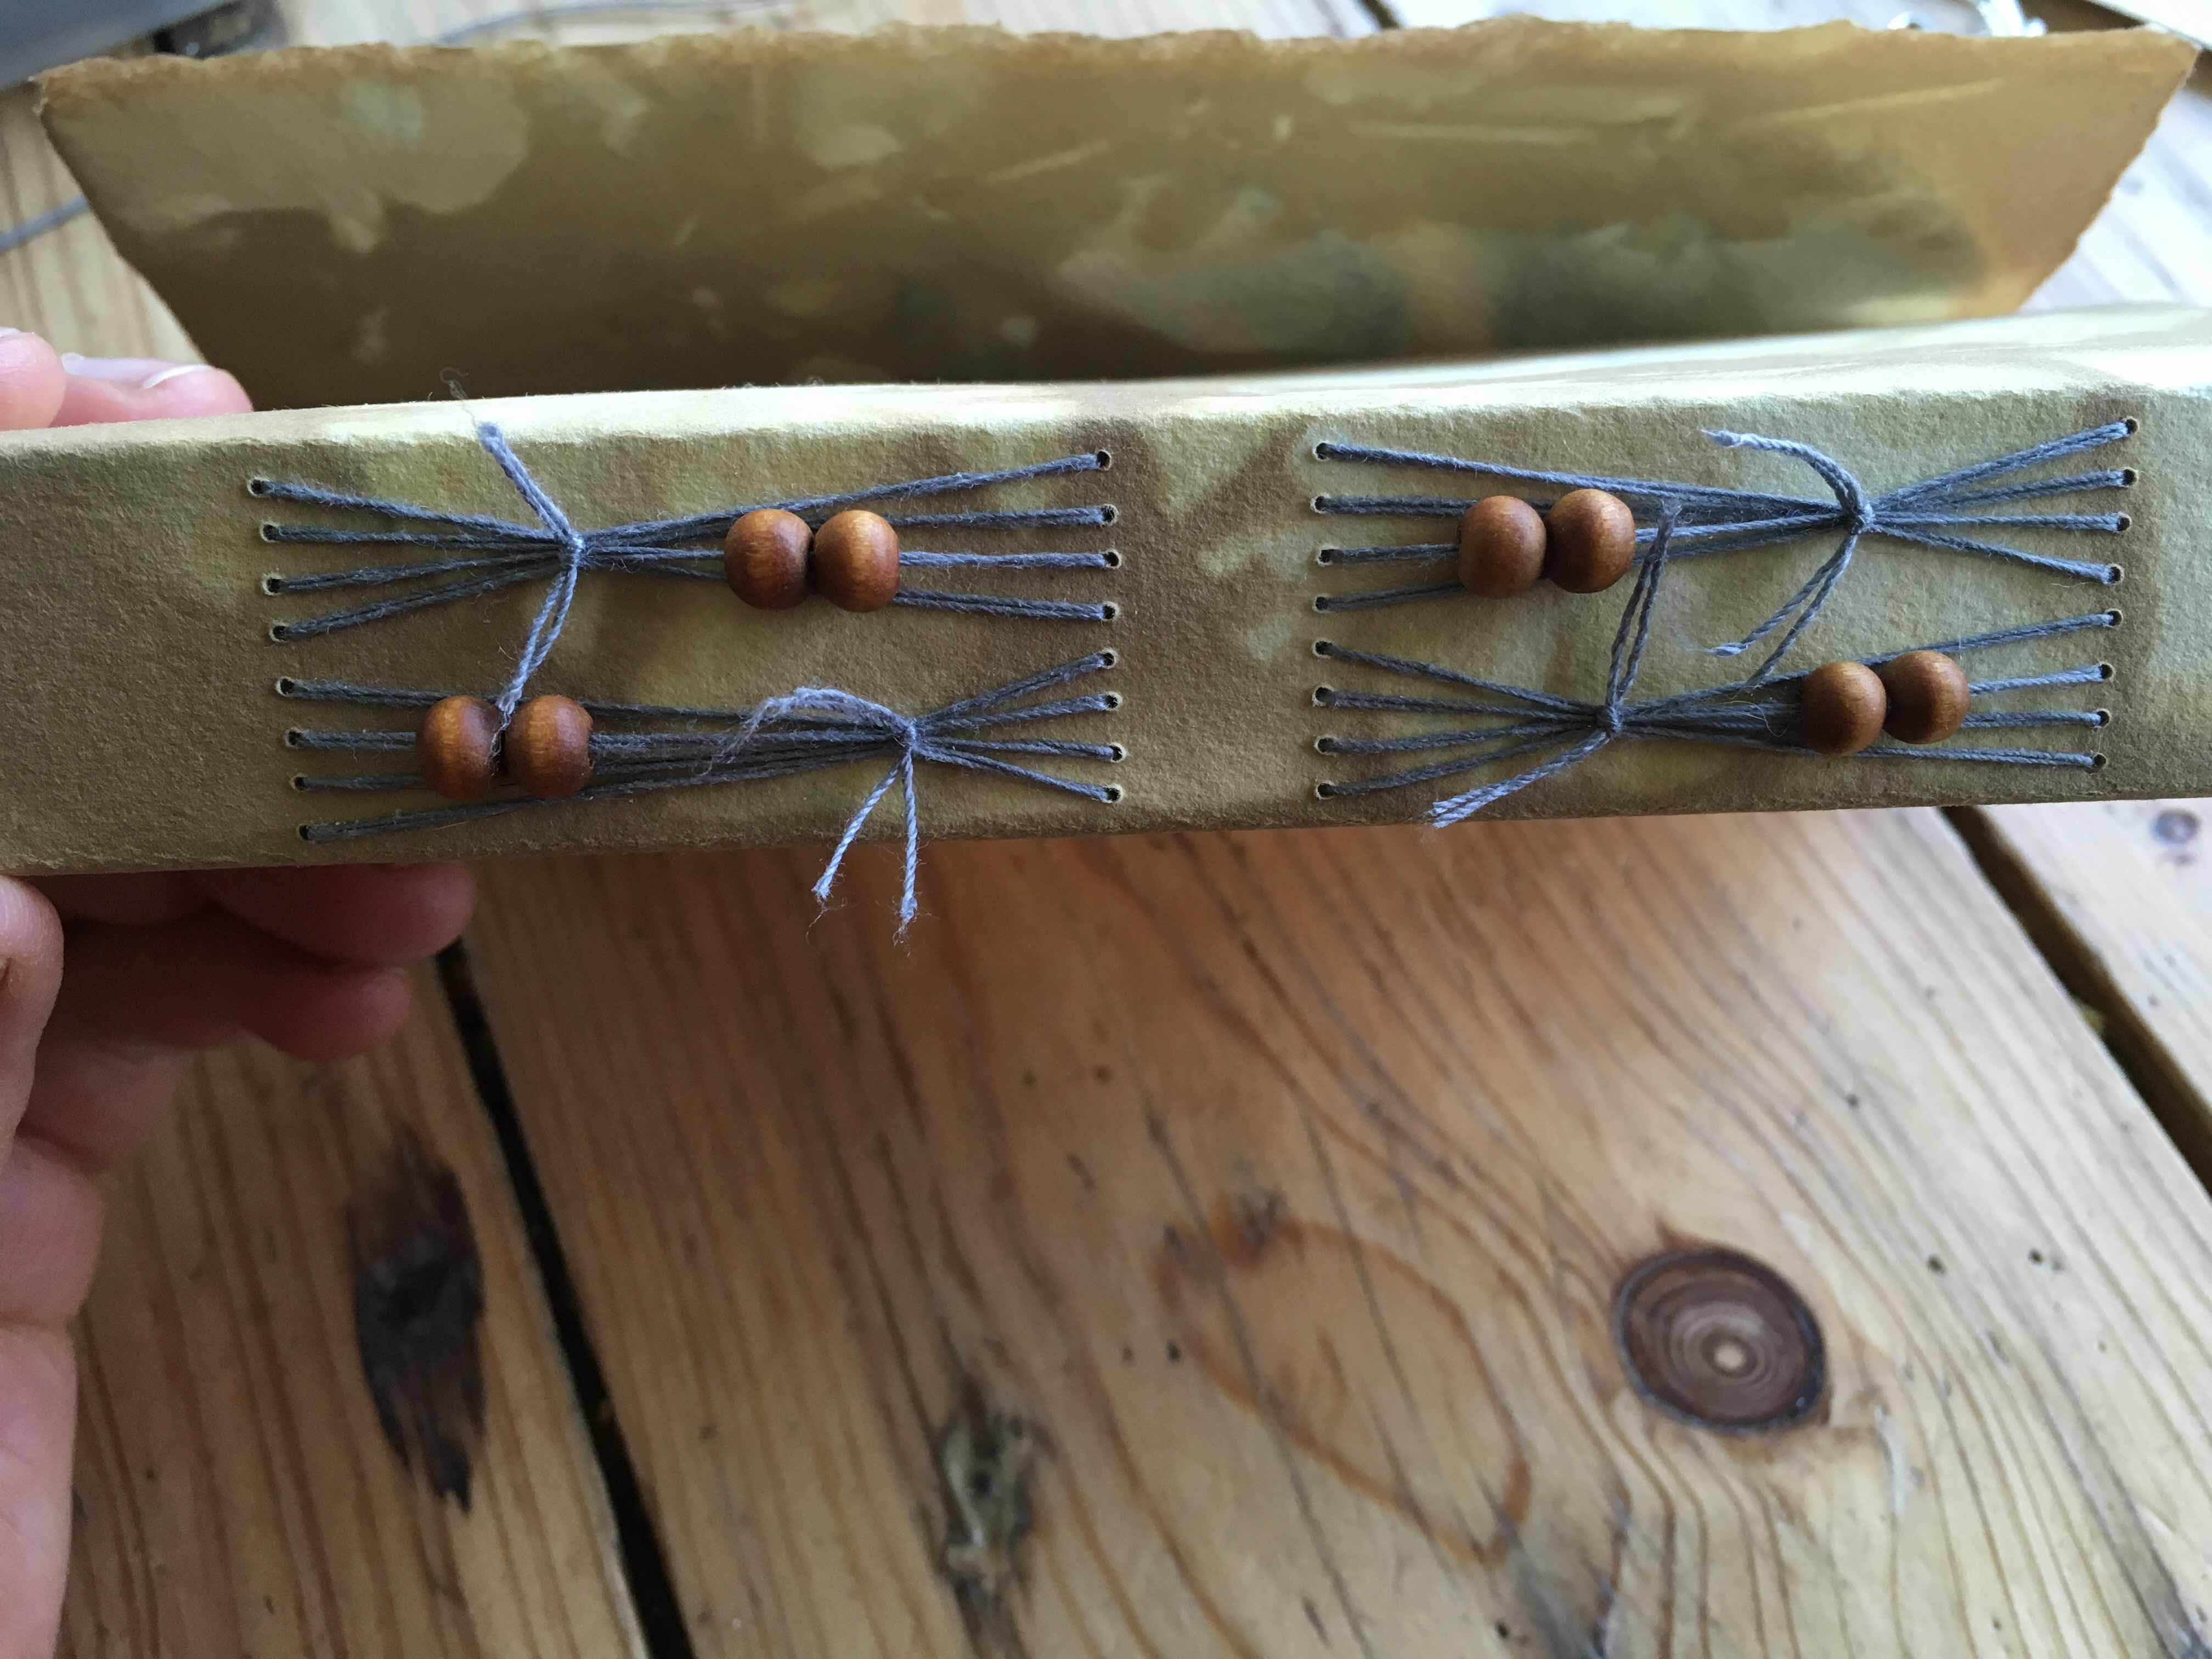
When I make a book I always enjoy the sewing process the most, I think I used a long stitch here, with waxed embroidery thread and added wooden beads on the outside of the spine.


The finished book from the outside, the wood beads on the spine with tied long stitch binding and the closed cover with deckled feature edge. The blue tint on some of the leaves is from red beech leaves. We cut a green beech tree a few years ago and it came back with green and dark red leaves. The red always turns blue, you can try it out with most red berry tea varieties as well. The teabags start out red and turn bluish during drying. I wonder what would happen to paper boiled in red berry tea?


I also made sure that I placed folios next to each other that also had been together during the boiling process because I wanted to have continuity while flipping through the finished book. I will give a few examples here of this continuity.

Two adjacent folios, one mirroring the patters of the other.


Same folios, this time with the deckled cover opened. I took care to place leaves under each deckled cover as well.


The whole folio opened, revealing another mirroring pattern.


The next adjacent folios, the one on the left is the one from the pictures above.


Same thing here, deckled cover opened...


And the full folio inside visible.


This is what I meant by continuity, even though each folio is totally unique they are still connected to each other by the mirrored patterns of their outer covers with their neighbouring folios. 

Here are a few more lovelies...


And now all I have to do is fill this book with some awesome art. And to be honest that is a little scary to think of because I love how the book turned out, what if I mess it up with a drawing? The only think to keep in mind now is that without its intended content the book is still incomplete and unfinished...


Boiling Another Book

Boiling a book, or boiling paper is just a fancy way of saying eco printing. I do not like to use the expression eco printing because even though I have read countless tutorials on it and watched videos about it, there always seem to be an awful lot of ingedients involved (like allum and mordants and such) and I tend to try and go the „easiest“ way possible with as few ingredients as I can get away with. I suppose, having stated I like to go the easy way, you will read on and throw your hands in the air and exclaim that my process is anything but easy and so complicated, but really the only difficult and time consuming bit was planning the layout how I wanted my book to be later and tearing the relatively thick watercolour paper I used.

I started out with a single large sheet of watercolour paper, it is larger than 18“ x 24“ (the size of the green cutting mat underneath). I absolutely love the natural deckled edge of the paper and I wanted to keep it for my book and even make it a key feature. So to have my pages all matching in with this I did not cut my paper, I folded it repeatedly on the same fold and tore it. I need 8 pages for my planned book, so the fist fold is lenghtways, in preparation of then tearing it into 8equal parts.


I will spare you the tedious process, here are my 8 pages with deckled edges.


For the next part the marking lines on the mat came in very handy. I needed to score and fold all my pages according to my diagram below.


This is what it looks like scored and the picture afterwards shows the page folded as planned, featuring the deckled edge.


I also planned out a cover for my pages to be sewn into and to be boiled along with the rest if the book. For that I went into my garden and picked plenty of different leaves and grasses. I then layered the pages as I wanted them, with plant material inside and outside and between and tied it into a nice loose little bundle ready for boiling. I do not have pictures of this process, but I have a picture of the bundle in the pot, simmering happily.


I used ordinary (black) teabags and roibush teabags for my boiling solution. No chemicals or dyes involved this time, I needed to use one of my cooking pots and chemicals would have ruined it for foodstuffs.
The ready package doesn‘t look very impressive draining in my sink...


But the effect when the leaves are removed and the pages opened up is awesome in my opinion. You will just never be able to predict what is going to happen during the dyeing process and will end up with totally unique pieces.


This post is starting to get a little lenghty so I will show the binding process in my next post...


Thursday, 7 June 2018

Tales From The Sketchbook

I think it is time again for a couple more of my heads. In the last few months I made quite a few, ranging from weird and scary to pretty and beneficial. I have also started to expand my drawing and painting techniques into the mixed media area by participating in online self study courses by an artist called Tamara Laporte, her webpage is called willowing.org and she uses (optional) meditations to highlight the good things and influences in your life and let go of the not so beneficial thinking habits and negative influences. 

I would like to start off with a positive girl I made. 


She is about finding “the light within”, the place inside not tainted by social media induced bullshit, the part of you that is not trying to tell you what a horrible and insufficient person you are but the little part that is good and clean. The thought of this place always reminds me of the Tarot card The Star and of having hope. So I would say she is a very positive girl indeed.


Hope Girl is closely related to Transformation Girl. 
Transformation Girl demonstrates what it feels like for me sometimes to try and turn the shit we see in the newspapers, online, the rubbish commercials and globalisation into something understandable and maybe even beneficial for my children. How do we explain to children the wars that are going on, the injustices in society, ethics and morality? Sometimes my kids (probably like all others as well) ask me questions I have no idea how to answer, one was why countries go to war against each other and if a soldier is a good thing, and what soldiers do when they come home. Those are really good questions to ask, a challenge to answer, and so much food for thought.


Then there was a good gap before I made the next girl, I started one other but I did not finish her as of yet. But the Ego- Clown had to come out.


Everybody has one of those, but he might take on different shapes for others. For me this is him, the opposite of the light inside, the part that whispers of anxieties and torture of the consciousness. He is the part of all of us that tells us we are not good enough, can never be good enough or how could anybody ever love such a thing as us? Unfortunately he is very strong, and the phrase “exercising your ego” is entirely accurate here, the more we use the clowns thought patterns, the more we exercise him, the stronger he gets. 
I am not so foolish as to think I could ever get rid of him. We all need our egos, our ego helps us navigate society more or less successfully, we can not do without him. But needing him does not mean he has the right to take liberties with our sanity!


And the last one for today is a positive one, it is inspired by Willowing, but I made it before I took any of her classes, I had just watched a couple of her videos on YouTube. She has a painting “The Happy Traveller”, where she uses an animal we feel drawn to, and since I love to draw and paint Octopuses I went for a mermaidy look. This is very much a mixed media painting using watersoluble crayons, acrylic paints, marker, watercolour marker and gel pens.


Sunday, 11 March 2018

Recent Mail Art

I have been very active and busy in the last few month with some mail art projects over on Afa, and this post is about those projects.

Firstly there is a monthly arted envelope trade with an assigned partner, and I am not quite sure why but I just had to make some envelopes with opening doors recently. One of my partners had stated in her profile that she was doing a lot of gardening design and floral arrangements. I decided I wanted my envelope to her to reflect that and I went for a walled garden (like a secret garden) with an opening wooden door. I am not showing the front as it contains my trade partners name and adress.


If you look real closely you can see the texture of the nails on the door, I used Lumiere metallic paints for those (not a sponsor), and my trusted inktense pencils for the rest.


I also found some tiny brads in my stash and I used them for the closure as you can see.


Now I hit a bit of an obstacle, drawing perspective properly is incredibly hard and I found no way I could draw the view from the gate into a walled garden in a way I found pleasing and with proper dimensions and so I had to go back to the drawing board for inspiration. Eventually I decided if I can‘t give my partner a garden, I might at least give her a lot of.... Space!


It doesn‘t come out in the picture, but I used an iridescent medium on the planets and the polar caps.

Up to this day I am not sure if my partner has received her space garden, she went to stay with relatives for a month about a day after I sent it and I have no idea if she is back yet or even if the envelope made it. Because it has the opening door I wrapped it in a clear bag for the journey. I will wait another week or so and then contact her via message to see what the story is.


And then there was February which is the month for Valentines Mail Art. For this people sign up and then make a valentines card for everybody who signed up for it. In the last few years this list had grown to over 20 participants, thank goodness this year „only“ 16 people had signed up. I had just before bought some mulberry paper online and as it was not how I thought it would be I had not used it yet and so I decided I would use it for this project. And maybe carve some lino stamps, too? I must admit, I carved some very elaborate lino stamps, but they did not work out for printing on the mulberry paper, I was very dissapointed. Instead I found some Indigo for dyeing hair in my arty stash pile, my husband had gotten it for me ages ago in a set together with Henna, and when I did research about maybe using indigo on paper I found only answers that said the Indigo for hair wasn‘t suitable for fabric dyeing, nowhere did it say anything about paper. And so I went ahead playing...


I loved the process, and I also found that a little water applied on top of the freshly soaked paper changed the indigo colour slightly. Unfortunately the mulberry paper itself wasn‘t thick or strong enough to be used a postcard on its own, but I used it as key feature on ebery card and my partners February envelope, too.

Now I just had to make some card for the background, and if there is one technique I started to really enjoy, then it is splash dyeing paper with fabric dye. It dries waterproof (a must for arting over it), the dye comes in wonderful colours and you really don‘t need much at all, the splashes are wonderfully random and add a surprise effect to watercolour and inktense pencil drawings. It really is playtime and highly enjoyable. 

For this particular project I chose a very pink colourscheme, it was for Valentines after all...

Unfortunately I did not take pictures of the process, but the first card you see here is for the birthday babe in the envelope and Valentines trade, it has the pink splash paper as base, inktense pencil writing and a little heart garland made from the indigo dyed mulberry paper


Up next is my February partners envelope, another one with an opening door, I used a different splash paper for the envelope and I used my pink fabric dye to dye the heart shaped door. The medium size heart on the door is indigo dyed mulberry paper with some fabric dye added also, and then a tiny indigo heart over it.


When you open the door you can read a message inside the door and the envelope turned into a shaker card with some heart shaped confetti and lots of glitter inside...I loved making this one. And the indigo dyed mulberry paper was used for every single card and envelope that month, I still have loads left over so I will be using it again.


Thursday, 4 January 2018

Happy New Year with more disturbed Ladies

I had started a girls head series last year, with each of these ladies depicting a different mental process or problem, be it thoughts being on fire, keeping struggles within or having trouble to think clearly with all the mental quicksand hampering you. 
So the girl series continues, simply because I love making them and also they help me to put an image to emotions or impressions that keep coming up. They are part of a creative personal therapy process one might say.
I am starting my post off with my Hex 18 girl. I know it is a weird title, it relates to the I Ching hexagram 18: Decay/ Work on What Has Been Spoiled. 


A very good friend of mine used to make me cast some coins and derive the hexagram from that for me. I honestly don't know how many times hex 18 came up, but it must have been a good 20 times or more, and there are 64 hexagrams in total and throwing the coins is used as a sort of randomiser as to what hexagram will come up.
The first line in the text for Hex 18 tells us that it represents a bowl with worms breeding inside. It wants to tell is that there is an issue that has arisen out of conscious neglect (or procrastination) and that needs to be dealt with. Eventually I got the message and I started realising that it wasn't a pointing of fingers but a pointing out of a source of a problem I was having and so I decided to firstly deal with the Hexagram and learn about it properly, since it wanted to tell me something that badly I owed it that much at least. During this learning process my Hex 18 girl was born. Although in retrospect I have to say she is a bit of a misrepresentation of the hexagram, as the hexagram tells us to work (and repair) on what has been spoiled and so maybe another fitting image might have been a broken bowl repaired with gold as in the japanese traditional craft of Kintsugi 

https://en.m.wikipedia.org/wiki/Kintsugi

Since I made this girl and learned more about hex 18 I took the time to make a study of the I Ching as well and I have never since gotten the 18th hexagram as a result of casting my coins. I hope for now I am dealing or have dealt with the issue it was relating to.


This next girl is what can happen if I feel quite contented for a while, no major internal struggles or anything so I could devote some time to drawing a Magnolia Girl in front of a desert ghost settlement. She is a nighttime creature and so she has some moths gathering around her blossom like a living crown.

I hope you enjoyed these gorls, I have some more to post and write about but I also would like to pace myself. I haven't posted anything in half a year and I have done plenty of arting since but all the pictures are on a different device that is currently not compatible with Blogger. Until I have worked something out I have to make do with what I have but that means a lot of my projects I can not show here just yet. 
Until next time, keep arting...

Wednesday, 12 July 2017

Origami bag

I have had the good fortune recently to be invited to another part of the beautiful country I live in and spend the weekend with a couple of very good friends. They moved to their new old cottage a few years back and as it is a good 4 hour drive to visit them and my pregnancy with twins got in the way of my last planned visit I had not spend more than just a few hours with one of them in the last years. I decided to take one of my sons with me and I was very happy when he got along splendidly with my friends daughters.
We drove down on a Friday evening and on Saturday morning we went to a lovely market in a neighbouring town. There was plenty of organic good food, antique jewelry, semi precious gemstones and lots of other goodies to be bought there, my local towns do not usually sport such an interesting array of stalls (my local towns market has 2 stalls).
In one of the sralls a little carved wood figurine caught my eye, it was a small sculpture of two baby elephants. My youngest son is very big into elephants so naturally I spot them everywhere. And this one was particularly special since the sculpture has twin elephants and I happen to have twins as well. I bought it and when I went home I spotted 2 small holes underneath it in the base. I remembered a few months back a friend over on atcsforall.com had shared something about a type of japanese carved button (?) and I spend about half an hour going through all the relevant threads this post might have been in, I think I finally found it in a post from March of this year. 
This type of "button" is called a "Netsuke", and back when Kimonos without pockets were a common garment in Japan the Netsuke was tucked behind the belt to secure a small box called an Inró. Both the Netsuke and the Inró could be carved and decorated in the most elaborate and skillfull ways.

https://en.m.wikipedia.org/wiki/Inrō

Now, I am not claiming to own an antique or very valuable Netsuke, but to me it holds a special value because I had heard of them on my online trading site, admiring the craftsmanship then, and then to discover by coincidence that mine has clearly found me.
I had to make something with it, and what better thing to make than something to put it to its intended use? An Inró would be way out of my league, but a small drawstring bag? I had seen tutorials for origami drawstring bags on Pinterest in the past and here is the tutorial I ended up following.

http://www.handmadiya.com/2012/03/unusual-bag-in-japanese-style.html


It is in russian but the pictures are an excellent guide.

These are the two contrasting fabrics I chose to use. I cut them to 10" square size.


I then marked my seam allowance on the reverse of the lighter fabric and pinned all around. For some reason I already forgot I decided to be lazy and not take out my sewing machine for this but to sew it by hand. Now I wonder how this decision ever made sense, but hey...


I will spare you all the different steps in between, if you checked out the tutorial you have seen them. So instead here is the finished little drawstring bag, with decorative buttons and the little Netsuke on the left.


Side view...


And this is what it looks like when it is opened. I am not sure yet when and how to use it but it was a bery satisfying process making it anyway ;-)


Friday, 12 May 2017

Random dyed paper


The country I live in (Ireland) is known for a few things: St. Patricks day, Guinness, celtic designs and... steady weather throughout the year. And with steady weather I mean rain. Rain in all its wonderful shapes and forms: drizzling, pouring, lashing and even the kind that looks like less than a harmless drizzle and has you soaked to the skin in 2 minutes.
In the last two to three weeks however we were very lucky because the weather was beautiful, sunshine and a slight not too cold breeze made a welcome change to the usual damp conditions. 

I decided to use the opportunity to create a new stash of pre-dyed paper to use later for arting and drawing on. I came to appreciate the random effect of the dye to create a background for the drawn design.

To dye your paper for later drawing you really want your dye to be waterproof; I tend to work a lot with Inktense pencils and watercolour and I would not want the background colour to reactivate and interfere with my intended later drawing. So I started doing a lot of research until I came across a number of artists on atcsforall.com that use fabric dye for exactly this purpose. Some use Jaquard dyes, I have Dylon dyes readily available in the stores around where I live.
The following picture shows the basic supplies I use for pre-dyeing my watercolour paper: warm water, dyes, paper, pipettes and - yes - coffee!


I like to vary the colours I use each time, this time I used Sunflower Yellow, Bahama Blue, Blush Pink and Goldfish Orange. The blue and yellow are suitable to make a lovely vibrant green together.


On the ground I spread an opened rubbish bag to sprinkle my dyes onto and dye my paper.


I do an initial layer of dyes, and I tend to to this layer with tone in tone colours like yellow and orange in the next picture. Then I let that dry completely!


After the first layer is dry I go at it again and this time I can use contrasting colour as well, like the lovely green shows. If I was to add the green onto a wet layer of orange I would get a murky brown colour.


Sometimes I want the two colours to mix, like the yellow and blue, and create a paper with a green hue to it, I can then go back later maybe with an orange or another colour.


Here you can see a little murkyness happening with the orange and pink and blue, I admit I did not wait long enough to add the paints. Right now the Dandelions are in full swing spreading their seeds and a few landed on my wet papers. I left them on and hoped for a nice effect like you would get from salt on wet watercolours. The effect is too subtle to be noticed, and maybe I would have had to dump a tonne of seeds onto my papers to really make a difference.


Now I have a good supply of pre-dyed watercolour papers and I hope they will last me for a few months. Who knows, maybe if you are trading on atcsforall.com you might be a future recipient of drawings made on these?