Friday, 10 February 2017

Canvas Book


A little while ago I completed a project for a trade with a lovely texan artist and I was itching to write a post about it here. As she has received it by now I am finally free to publish it here.

I was drawn to the theme of opposites, to be more precise to the theme of Day and Night, Sun and Moon. But to just simply paint a sun and a moon would not have been a complete mixed media project in my opinion, so I used a little Pinterest inspiration and made my trading partner a book out of two canvases back to back.

One side is the Sun


The other side is the Moon


I added two lovely antiqued hinges to the side and below you can see the outside of the opened canvas book.


I continued the theme of Day and Night on the inside by placing a fabric origami butterfly inside the sunny side and a fabric moth inside the dark side. 


To make the fabric more workable for my purposes I used version of a technique called paper fabric. Originally you would use diluted pva glue and different layers of papers and tissue to make a sort of fabric. I used fabric and stiffened it with diluted pva glue for the origami butterfly and the moths wings. The antennae for both were made with curled wire.
I drew flower in the corner onto tissue paper and then coloured it with watersoluble crayons and matte medium before adding it into the canvas. The whole project was varnished with a waterbased satin varnish for protection as a final step.


Wednesday, 18 January 2017

Notebooks


Recently over on atcsforall I saw a share on one of the threads about diy Midori notebooks, also called fauxdori. I noticed Fauxdoris on Pinterest and I must admit they had my attention because they just seem to be pretty versatile and customisable. And for someone who can make the inserts themselves customising a notebook like that is easy as pie. I already had everything in my head planned out when I saw them last year, one insert with lined paper for writing, one insert with watercolor paper for painting and drawing, maybe a plain insert. And then I had to stop myself. I am someone who starts a notebook but never finishes it, and the same goes for sketchbooks. So it would really be a shame to make a Fauxdori and then not use it, and also feel guilty about it. 
But there is something I love, and that is crafting, sewing and also in a small way bookbinding. So I put the thinking cap on before Christmas, because I needed some quick Christmas gifts for friends. This is the layering of fabric and batting, with "pockets" on the left and the right side.


This is the outer cover and scrunchie closure of one of the notebook holders I made. I made several different ones, with different fabric for the outside and the inner lining.


And another one of my notebook covers. I really like this fabric with the stained glass Iris design.


This is the inside. You can see the pockets on the left and right sides, the notebooks slip inside easily. One Notebook cover holds 4 of these 120 page notebooks, the notebooks come in lined and math versions. I chose to use these booklets because I love to write in them and I always have a stack of them lying around, they are what my kids use in school and they are quite cheap. So in a way this is my compromise between a true "Fauxdori", the urge to craft and the fact I kind of don't really need a handmade notebook. But as it turns out, I am regularly using the bought notebook in my diy holder. It could be altered with strong elastic to work like a fauxdori, and these notebooks could be used as inserts, but for now I am happy with just the way the covers work.


Sunday, 25 December 2016

More Henna Art

Just the same as pretty much everybody else that celebrates Christmas I have been getting ready for the big occasion. Not by going to the hairdresser or getting a manicure and pedicure, and not by frantically going to the supermarket or the mall for some last minute shopping. I had ordered some clean and organic Henna powder online and then wited patiently for my previous Henna stains to fade so I could pretty myself up a bit for Christmas.

This time I actually "planned" my design in a sketchbook first, and I carefully mixed my Henna ahead of time, taking note of how long the dye release process takes etc. It was all very scientific. I also made some test tattoos on my feet so I would know what essential oils produce what kind of a stain. So thusly prepared I happily went ahead and made my hand and feet very pretty indeed.

Before I show you the pictures I have to give special mention and thanks to my husband. He has a very fancy camera and he is very good at taking pictures. And he also has all these different lenses for different kinds of pictures and so on and so on, I think you get the idea... he has camera gadgets.
And he always insists I make sure I post only high quality pictures of my work because I usually just use the low resolution camera on my iPad for convenience. But this time I ASKED him if he wanted to take pictures of my Henna tattoo and he gladly obliged.
The poor guy. The lense he had on his camera was not a very good one for photographing hands, I was quite shocked to discover the extremely stumpy nature of my fingers. So he had to change lenses several times until I was finally satisfied with the non- stumpy result. But even now, several days later, in the middle of a discussion I am about to loose, I will refer back to this moment and accuse him of giving me stumpy fingers.

Well, the final result are a few very nice pictures of the fresh Henna paste on my (not stumpy fingered) hand and on my foot. On the foot design you can see the test stain on the side of my heel, and let me tell you, they turn very dark.


And gosh did I have a big amount of mixed paste left over. Good that a day later a friend came to visit and she is one of my guinnea pigs for Henna designs. So I was able to use up my paste on her...


And I have to say, my husbands camera takes much better pictures than my little iPad camera...

Happy Christmas !!


Sunday, 11 December 2016

Henna Art

I was so very lucky recently as to have been invited to an irish-indian wedding. Due to the amount and lacking maturity of most of my immediate family members my husband and I decided to enjoy this big event in turns. As it was spread out over two days, with a bridal blessing first and then the actual ceremonies the next day , we split it evenly into two and I decided I would go to the bridal blessing as I knew later on in the day there would be a henna artist present. I had not had a professional mehndi done for me before, but I dabbled in it myself about 3 years ago, before my youngest were born. So I was overexcited to go. 
I won't go too much into details about the blessing, suffice it to say it was very beautiful, and definitely an experience I am very glad NOT to have missed. 

Anyhow, this is the mehndi I got done on my palm by the henna artist. The stain got even darker over the next day, and I love how she used the thick dark border to make the petals stand out more.


But the queue waiting to be painted was very long, and I knew it was going to be a long time for my turn to come. Then some of the indian girls decided to go ahead themselves and paint each others hands, and as I was sitting with them I was basically given a henna cone and "offered a hand".  I was doing a few henna designs that night, and I absolutely loved, loved, loved doing it. I have only one picture of a design I did on my moms hand, and I know that someone took a picture of me getting my own left hand painted by the pro while I painted my mothers hand. I HAVE to have that photo, just gotta find who took it...

My moms design...


I can honestly say that that night has rekindled my dormant passion for henna mehndis. I have since found a source for ready made cones and am currently sourcing for clean, unadulterated henna powder. But in the meantime, this is what I have been doing to myself...


after paste removal...


and darkened overnight...


This was my newest on my left hand...


again after paste removal...


And my left foot, since my right foot is already painted...


... also a bit higher up the leg...


And both after darkening a bit. The one on the leg will not be as dark, because there are less skin layers to stain


All of the above designs where made with a ready made cone, left on until the paste was dry and then peeled off. I reckon that if I can get my hands on some high quality henna powder and essential oils, seal the stain after drying and dress the stain warmly I can improve the darkness hopefully significantly. Stay tuned, the henna is ordered and on the way. ;-)


Saturday, 3 December 2016

Puppacatchookie Award

I have another very good art friend over on Atcsforall, and if I say no more than that she is the best Puppacatchookie wrangler of all time you all over on Afa know who I am talking about. Now, our head wrangler was having her birthday in October and shortly after announced she was arted out and needed a break. I decided to make her a little birthday present, and as she had mentioned in one of our trading threads that she had so far only ever received prize ribbons but never a trophy for anything my mind was made up. A trophy it HAD to be, and since she is the head Puppacatchookie wrangler... well, you guessed it.

So first we have to clarify, what exactly is this mythical Puppacatchookie? It is a mix of dogs (puppa), cats (cat) and chickens/roosters (chookie).
So into my art supplies I dug, until I reached my polymer clay stash. And this is how the trophy was born.


Hold on, this is not yet right, it is only the start of our mythical creature.


Much better already, thanks ro my rudimentary knowledge of Cristie Friesen techniques I was able to produce something dog like, with a cat tail. It just needs a few more details, a base, some additional patina and paint...


and of course feathers...


So far, so good. Now how on earth do I get that over to America IN ONE PIECE???

I knew I had to put it inside something really sturdy, basically unbreakable, and what would be better for that but a coconut shell? I happened to have 4 coconut halves (they used to hold ice cream and after that was eaten I could not throw out the shells so I washed them well and put them aside for later use. However, they were of 4 differently shaped coconuts and so I had to do a little matching to find the shells most suited for one another.
But then, how could I possibly send her the trophy in a plain, wrapped coconut shell? After all, we are artists and crafters, wouldn't it be a bit on the easy side to send it "as is"? 

So out come the paints again...


And I also used some ribbon for a hinge, and used paper collage on the inside


And then, while I was at it and the cream paper looked a bit bland I also did some decoupage flowers inside (thank you Nanner for sending the flower tissues).


Top and bottom insides, with the last finishing touches put on.


For the outside I decided to use a sort of underpainting technique you might say, first I put on a simple background coat, then a white coat where the desing is to be, then the colours for the design, then the 3D outlines and then a coat of varnish.


And with the bubble wrapped award inside it


Yes, I know there is a crack in it. I only had a limited amount of half shells at my disposal and had to make do. However, this crack ruined my original plans of sending it to my friend overseas with just the coconut around it so I did end up sending it wrapped in some more bubble wrap and inside a sturdy box. Just to be on the safe side.

I have received word that my friend has received her birthday present now (I sent it off waaaaay too late, one reason was that the project got bigger and bigger as it developed), and she is over the moon with it. I am happy to know she loves it, I wanted her to feel special as she has been a great inspiration to me and has spurred me on in my arty endeavours at all times. She deserves a little goodness and if you came here from Afa and you know who I made this for, please go ahead and make her a little something as well, RAK her. She deserves it in my opinion...

Go on, do it ;-)


Tuesday, 29 November 2016

Art project for Kristen

It has been too long again. My last post is over a month old and it is about time I update you all again about my arty endeavours. 
In my last posts I introduced a featured artist, Kristen, and I shared with you the beautiful reversible art canvas she made for me with a dragon and an egg.
That really resonated with me and I knew I wanted to make Kristen something with a dragon as well. What better opportunity than for our birthdays for the middle of the year? (Both our birthdays and wedding anniversaries are similar dates, just kind of reversed) 

So I set about planning a beautiful art canvas for her, also featuring polymer clay, but I wasn't really happy with what I was planning. I felt it was too close to what she had done and not original enough. And while I was pondering one day my eyes fell on a set of plain, wooden nesting boxes I had purchased around last christmas. These boxes had recessed lids and in the recessions they all had a fitted canvas board. 

Muahahahahaaaaa, perfect.

After all, why stick to a plan that doesn't feel good enough when you can throw all planning overboard and get creative?

I stuck to the dragon scheme and developed a storyline, to develop as each nesting box is revealed inside the next. The materials I used were acrylic paints, polymer clay and mica powders, wire and seed beads, and last but not least, fabrics and varnish.

The first box tells the story of the beginning of a great love story between Mother earth and a dragon...


I also painted some iridescent medium onto the sides to emphasize the scales of the dragon.

The story continues when the two lovers meet to place a great treasure under the tree of life...


I used the same iridescent medium to make the stars of the universe. The tree fitted nice and snug into the recessed lid.

And the last box reveals what this treasure is all about...


And to finally reveal the treasure within...


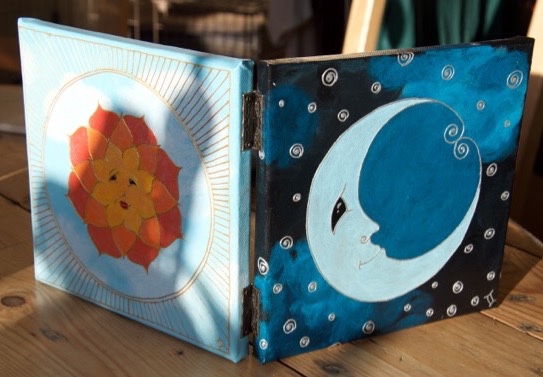
I have to admit, it was very hard to let them go to their new home, I enjoyed making every single box and coming up with the story, and basically a lot of heart and thought went into this. I will admit that I did not use all of the canvas boards that came with the set for the set. I indeed was so sad to have to part with this project I decided to use them for myself (there was no more space for them in the boxes anymore anyway), and I made muself another swirly-rooted tree and another mother earth face canvas. They are a little sentimental reminder of this creative adventure. 

As things are, I am in the middle of a christmas project for Kristen. I am trying to get it finished in the next few days so I can still mail it to her in time for Christmas, but I might not be able to pull it off. I might have to post it too late, but should that be the case of course I will let her know.

And now, as a last small visual treat, here is a picture of all the boxes together. 


Sunday, 9 October 2016

Featured Artist: Kristen part III

So now as promised in my last entry, I saved the best pieces that Kristen made for me for last. And this time I am not talking hd/hp but sculpted goodness she sent me for Christmas. I could not believe my eyes when I unwrapped her package and to this day the pieces are on my nightstand right next to my bed so I can see them when I go to sleep and first thing in the morning when I get up.

She made me this beautiful polymer clay snail on canvas, with beads and texture paste! I just love the snails elegantly curved eye antennae.


And then this mindboggling piece. I have never asked her about it but I am pretty sure she even made the canvas herself.


This is the front of the canvas, featuring the cutest Christie Friesen inspired dragon EVER!!! Kristen had mentioned before she was a Christie Friesen fan but I never looked up her works before I saw this. Isn't the dragon just adorable? The dragon and the flower both feature sweetwater and lther pearls and beadwork. 
And then I turned the canvas over...


And here is the treasure the dragon is guarding, one single, beautifully ornamented dragon egg. I love the mixed media approach in this, I have not yet used newspaper or bookpages in my work. And the canvas itself is about 4" deep. I turn the canvas around on my nightstand every now and then, but mostly I like looking at the cute dragon and flower on the front.

THANK YOU KRISTEN! 

To finish off, I will share a little pendant that Kristen made out of her own art and a scrabble tile. And yes, i do wear it on special occasions...