Sunday, 24 July 2016

Just a quick post

I really have not been posting enough as of late, so I decided it was time to share at least a little bit of what I was up to. 
I is the time of the summer holidays and so all my kids are at home with me, plus some additional guests we have this month. First we got a visit by my parents in law who came over from Germany in a camper van. My in laws are fabulous, my father in law can't sit still and so we gave him diy jobs to do. He finished painting doors I had started (gosh how I hate painting doors), put extra shelves into my kitchen presses and helped putting up a fence so my twins won't be running onto the road. My mother in law is great at tidying, so my kitchen for once was spotless!
Then after they left we got some more visitors, my husbands childhood friend and his family are staying in our house with my hubby and kids. I am taking the little ones every evening to sleep at a friends house who is on vacation. My house is just not able to sleep 10 people!

So as you can see I am plenty busy but still do some arting, after all otherwise I would go nuts. Most of my projects are for people who have not received them yet, while others need a separate explanatory post first. I won't be able for that at the moment so it has to wait until I am back home. 

But I can share with you my first proper whimsical mixed media face! I used markers, acrylic paints and newspaper pieces, I hope you like it. Any tips you can share with me for nose shading, I am all ears...


Sunday, 19 June 2016

Watercolour sketchbook

I have recently been big into bookmaking, but if you have read my previous post about boiling a book you probably already knew that. I have also however been making a sketchbook for exploring my watercolour set I bought July of last year. 
At the same time I bought this w/c set my mother in law passed an old watercolour block on to me, she used to do some very impressive drawing herself. I was not overly fond of the paper I must admit for it was of the very rough sort of variety and as I usually use Inktense pencils I shied away from it at first. I had it basically just lying around in my workspace and for some reason the other day I decided I would take the pages that were left and turn them into a small watercolour sketchbook.
Taking the pages out was not as easy as expected, they were glued down on all sides and I had to carefully cut them all loose. I then folded the pages in half across, decided I would like more than just 4 folios and also folded and tore across the lenght as well. I ended up having 8 folios (not signatures, just folded single pages). Now I have to admit that I can be very stingy somethimes and even though I was not overly fond of the paper, I did not want to loose any pages because I had to glue them to the covers. So instead I added 2 more folios, one in front and one in back, to glue to the inside of the covers, thus enabling me to make use of all the pages I got out of my paper. 
For the covers I decided to stick to my stingy mood and as the watercolour block I had finished off had some very thick board backing, I used that for the extra sturdy covers. I covered it with pieces from an old corduroy shirt my hubby used to have.
This is the finished little sketchbook I got, I loved the hemp cord I used to sew the bookpages to and so I did not hide it all inside the covers but kept it out for closure.


I also used some handmade paper beads made from some newspaper pages I was sent with an art trade overseas.
This is the spine, and no, I did not use the coptic stitch. I am not sure what this one is called, I got it from a very good YouTube Video tutorial on how to make a DIY Watercolour journal.


So by now I am a few pages into my little book and I have to admit, the rough paper I looked down on at first turned out to be THE BEST PAPER EVER! And of course I was so stupid to throw out the cover telling me the brand and weight and the garbage men had already emptied the bins! AAAAARGHH!
Maybe my mother in law will remember what she gave me and be able to organise me some more, and she is the best mother in law there is.

Anyhow, here are the pictures I painted so far. I tried out a good few tutorials on

How to paint lilac


How to paint a tree


Next just a sample of all the colours in my watercolour set


How to paint a Sakura Tree with a splatter method


And then I decided I would try out in watercolour what I want to paint into my moleskine accordion journal with acrylics. Just to figure out if I like the idea, the theme I chose is Tree of Life


Then I was given some Poppy plants for my garden


and then I tried out some more classic techniques. But I think the space I used them in is too small to really bring out every effect properly (or I used too much water and need more practise). I also used my new drawing nibs and Indian Ink for the outlines and the writing.


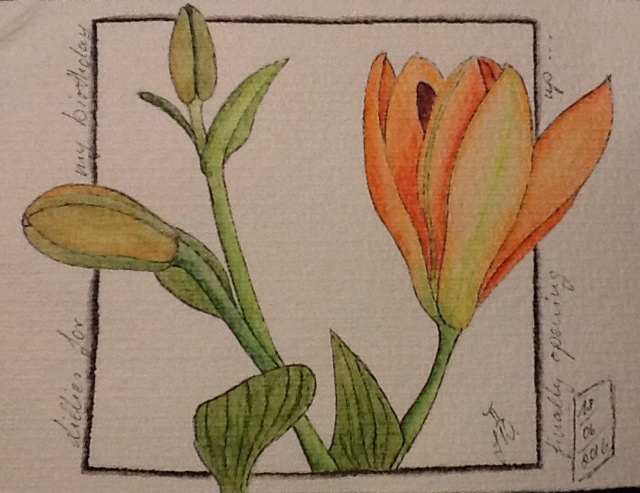
This is the last picture to date and so far the only one in this book where I used my Inktense pencils. I wanted to "get it right" and so avoided the very medium I want to practise in this book! It is a Lilly from my birthday flower bouquet my husband gave me.


I will wait until the same flower is fully opened and before my kids have torn it apart, and then paint it again but this time using watercolours!


Monday, 13 June 2016

A day outside

Yesterday was a great day! I have been cooped up with my bundles of joy now for a few weeks, and even though the weather has been exceptionally good and sunny (enabling us to spend a lot of time outside) I was getting desperate for a break. Sometimes I just need to get out of the house and away from the permanent clutter I am trying t fight on a daily basis, and away from the bickering and fighting and shouting (It's mine! No mine! ). But the last few weeks there was always something that stopped me from going, always some major task or occurence that needed urgent attention, plus some very sudden other demands on our time that we had no influence over. So busy and stressfull!

But yesterday morning my awesome husband told me to go off for the day and to do it quickly or I might get stuck at home again due to some emergency, real or imaginary...

So I took my drawing supplies and left, in search of a coffee shop that was already open on a sunday morning at 9:30. No such luck. I found an open supermarket and got myself a can of baked beans (I ate them cold in the car, straight from the can, that's how hungry I was), rolls, a huge mixed salad and some cooked ham. After that some coffee (not half bad), and while I was munching away in my car a thought struck me. Why not make the journey to an old castle and gardens in a neighbouring town? The weather looked a little doubtful, but I had wanted to visit the gardens without children in tow for years now, so why not?
The journey was good, but a good bit of rain so I was starting to have some doubts. But the minute I had paid admission and stepped outside into the park the sun came out and the weather turned bright and sunny with just a perfect breeze. Yay, lucky me. The weather was so good I even got a little sunburn.

And here is what I did that day. for about 6 hours I just walked around, never visited one spot twice and drew to my hearts content. Most of the things I drew I found out the names or already knew them.

The first thing that captured my eyes was a stem for some sort of rose, no flowers on it so I have no idea what the rose looks like. But the thorns on the stem where the most brilliant thorns ever!


Next I was stopped not by my eyes but by a wonderful scent in the warm air and I found a huge Yasmin bush like one I used to have in my own garden.


And then on my way into the formal part of the garden I saw the most queer plant ever. It had little 3 chambered hollow seedpods. I know they where hollow because some had fallen to the ground and when I stepped on one it popped. I found a name plaque on one of them: Stapylea bumalda, usually at home in Asia.


These took about 3 hours in total, drawing AND walking around, so I had my huge mixed salad and rolls and ham for lunch. Mjam! (I did not draw my lunch)

Next up is a Calla Lilly from the formal part of the garden, I know they are not unusual but I don't have amy in my own garden (yet) so I drew it.


And some lovely though nearly faded Rhododendron flowers.


And last a Poppy, I love Poppies, in bloom and after. The seedpods look awesome with furry stars on top and I hope the ones I have been given for my garden will survive my kids.


Drawing outside and in public was a very new experience to me, when I sit in a coffee shop and draw noone really pays any heed, but outside people notice very much and they will come up and peek over your shoulder. It took all my concentration not to let that make me too nervous. I also realised that if I want to do that again (yes, please) I will have to modify my mobile art backpack to accomodate a bigger size drawing pad. I had set out with a different thing in mind and so my watercolour pad was huge! (A4) My bag only takes half that size. Also it was tricky handling my roll of Inktense pencils. I wanted to practise watercolour when I set out but I was not confident enough to do it plein air. Instead I tried to concentrate to draw realistic (not whimsical) and keep outlines to a minimum. I tend to fence all my colours into an outline and I feel that takes away dimension. So definitely stuff to work with. I also took plenty of pictures and until the next time I am there (at a different time of the year with different flowers) I habe plenty of references to work from...


Tuesday, 31 May 2016

Boiling a book

I am always on the lookout for easy and interesting projects to do with my kids. Now these projects should be easy enough to do, not take up too much time in my very busy schedule and be interesting for me, too. So, easy peasy...
Then the other day a video was recommended by a crafty VikingLady, a video about how to boil a book, or dye paper with leaves and dye. I was immediately interested, since boiling time is over an hour and it can just boil away happily while we go and do other things like potty training, homework, cook dinner and so on...

Let me see if I can post a working link so you know what I am talking about

https://m.youtube.com/watch?v=ULFIuj1euQ0

If this link doesn't work, just c&p in your browser.

So the lads gathered lots of interesting looking foliage, and even some tiny forget me nots (made lovely flower outline but no colour) and I got the water on. I added salt in there as well, as the dye I used needs water to be activated. 
Then we layered the folded signatures and leaves, sandwiched everything in between cardboard and tied it with string. I had the feeling it was too loose (didn't the guy in the video mention this?) and wedged a stick between the sandwich and the string. I thought it was still very loose but I left it at that.

Once the water was ready and the vinegar added (careful, lots of foam!) I added a steamer insert so the package wouldn't touch the bottom, only to discover the package floated! (sorry, I did not take a pic). I had to keep it submerged with two rocks from my garden, these rocks are now a lovely shade of blue.
1 1/2 hours later I took out my little soggy parcel and was surprised to find it basically intact! 


The size is half an A4 sheet of watercolour paper, torn in half and then folded in half. I would have to measure it to be exact, but it is about the size of a pocket size moley.

Then to start taking it apart. This is an Ivy layer. As the guy in the vid said, the more structure the leaf has, the better the imagefrom it. So look for anything sturdy, stringy, woody, the more delicate the less likely you get a strong imprint.


And here are a few of the signatures out to dry, I will get two books with 5 signatures each, that makes 20 pages for the lads to art on or marvel over. 


This signature is one of the more mushed up looking ones when you just look at it, but hold it up to the light...
You can also see how some leaves have released some yellow colour onto the paper and made a lovely green with the blue dye I put in.


And this is one of my favourite pages, the back page where some colour from the cardboard penetrated the paper as well.


I will do this again, it was so much fun to collect the greenery and layer it all. Iwill probably use stronger leaves next time and not layer so many leaves between all the pages but keep some plainer with just one type of leaf. I don't know the name of the tree that released the yellow dye, but I will use it again because it also left great imprints. 
I am now probably outing myself as a complete gardening idiot by saying it is some kind of cypress (I know cypressus macrocarpus and this one has similarly shaped cones just teensy weensy), here is a pic of the leaves (?) 


That is it for now, I have so much more to tell but not tonight.


Saturday, 7 May 2016

I love art hands

Yes, I do. I absolutely love working with the hand and finger shape, and the ones I posted today went to two people very close to my heart. The first hand was made for my longest and best friend back home in Germany. I would have loved to give it to her in person but it will be a while until I can visit her and I will make her something else for the occasion!


Anyway, this is the front of the hand I made for her. I wanted to make it really colourful and I also added lotsof glitter gel pen, you can't see it though, it doesn't come out in the picture.

And this is the back (done with markers)


And I could not help myself, this is what "Envie Addicts Unite" has done to me, I just HAD to art up the envelope as well. Teehee, it is a padded envelope (bulky) and when my friend said to me she would feel guilty to throw it out I said to keep it. I have no idea how she is going to store it, I would probably use it to store received EAU envies inside...


And the other hand I made needs a bit more of an explanation with it. I made it from another friends hand shape. This friend has in the past more than encouraged me to explore my arty side and she also got me started on a major project that will probably keep me busy for another year. 
She writes songs (and probably poetry as well) and her (very) own music, and she also is into Astrology. She likes spiders and in her own way is a doomsday prophet. (I wonder what she is going to make of this des riptioon). All of these themes have found their way onto her hand.

Front


I redid all the webs and the spiders in glitter gel pen, and also the planet notes, but the pictures doesn't do it full justice.

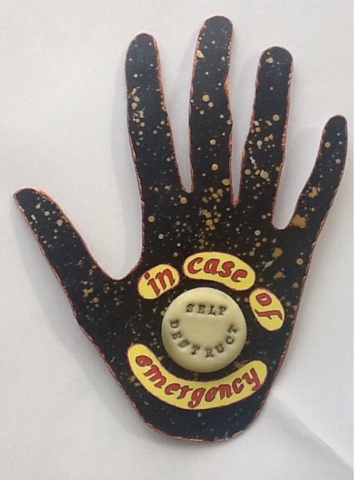
The back is done in acrylics, marker collage and polymer clay...


I have wanted to make her a self destruct button for a loong time, and this one glows in the dark, too! How long will she need to discover that? (Muahahaha!)
I protectively wrapped it into this ( the most telling ingredients list on the back: sugar, syrup, honey, more sugar, some added glucose and then carbohydrates)


And then mailed it in this


Maybe I should mention she lives just down the road from me? Envie Addicts, this is all your fault! ;)


Sunday, 1 May 2016

Tea Bag Art

Hello, everyone. 

Some of you may know that I am actively participating in regular and occasional art swaps on the marvellous website Atcsforall.com. There I was made aware of a new swap that I could not believe at first: Tea Bag Art. That means doing stuff with/to used tea bags! 

My first reaction was disbelief "surely, nobody would..." but alas! As I was searching another of my favourite webpages (Pinterest) for this subject I found out that "somebody would" actually quite a lot of people seem to do it. And as I love new and unusual arty things to try I signed up.

This post is all about my process of handling the very delicate tea bag material and also the FAILS! I was so happy today that I had gotten one tea bag painted successfully, but I will let you find the flaw for yourself later.

There are two basic types of teabags, the flat ones and the folded ones. They seem to be made of slightly different material and in my house they are holding very different sorts of tea. Let's start with the flat kind. The only type of tea I have in those is the regular kind, and a very strong variety that gives the bag a pretty intense stain. I do not leave the bags in for more than 30seconds, otherwise the brew just gets too strong for me.


As you can see I already did some experiments on these. The two on the left are used so you can see the colour is pretty intense. The bag on the top left was drawn on with a fine marker, that worked well but the material is quite rough and even a light usage of the marker can widen gaps in the paper into gaping holes. The big orange stain on its corner is watercolour and it just kept on spreading and spreading. On the bag bottom left I did a kind of reverse technique, I used watercolour first and very sparingly, and later drew around it with the marker, results are not really any better than trial no. 1.

Next up is the folded kind of teabag. In those I have what is called "Yogi Tea" here, a herbal sort of a chai variety.


As you can sea it stains a LOT less, even though the contents was dried inside the bag. When I opened it, the tea inside was stuck to the paper and I could not remove it. So for the next ones I removed the contents while the bag was still very wet and inside a container with water to wash the tea off. The material now has very little to nearly no stain, but the bag is free from residue and intact. 
On the other hand the fabric(?) holds up really well to watercolours and markers, with very little to no spread of colour.


I used the teabag shaped piece of card to predraw the design, then placed it under the bag and drew the outlines. 
I found that while painting in the coloured areas I had to make sure the material was not touching the surface underneath it or the paint would start to go everywhere!
As the bag itself was hardly teastained at all I gave it a nice background with very light watercolours, I might prestain the material with some of the tea from the flat bags.

So now here is the final trial piece, I was a bit disheartened when I spotted my mistake.


So keep in mind when you are using this folded kind: there is a definite FRONT and a definite BACK! 
I am not dissapointed to have to redo this one, I learned some valuable lessons for the tea bags I am sending in to the swap. And maybe this post will help others in avoiding the "pitfalls" I had.

;-)


Sunday, 17 April 2016

One more hand and more...

I have to admit, I love making art hands. I am so glad I saw the art hand swap over on Atcs for all, and that I got accepted into it. The swap was already pretty much full and luckily I got in. Well, you can see the hands I made for the swap in my post from the 28th of March, and then I made more hands in my last post. I have one more finished and the person it was intended for has received it so now I can post it.

I made another Autumn hand for a fabulous trading friend of mine, her art is so wonderful, it took me several weeks to even dare to ask her for a trade. When she accepted I really gave it more than my all to live up to her talent and she assured me by now She was over the moon with what I sent her.However, trading with her has really influenced the way I draw and even the point at which I regard a card as finished and so I wanted to surprise her with a little something.


I tried to make it look as if the tree was coming out of the Cornucopia as well, cause that is where trees come from, isn't it ? ;-)

And this is the back. If you look closely you can probably make out who I made it for.


I could not help it, when I placed it in the large padded envelope I noticed all the arting space on it, and even though it is a yellow envelope, space for art IS space for art...


Of course that is not all I made recently. I also made an art envelope for a partner and I was in a weird mood, so I had my way with a classic painting.


I wrote the adress on the waves on her right hand side. And the back shows it is not really a calm day.