Saturday, 7 May 2016

I love art hands

Yes, I do. I absolutely love working with the hand and finger shape, and the ones I posted today went to two people very close to my heart. The first hand was made for my longest and best friend back home in Germany. I would have loved to give it to her in person but it will be a while until I can visit her and I will make her something else for the occasion!


Anyway, this is the front of the hand I made for her. I wanted to make it really colourful and I also added lotsof glitter gel pen, you can't see it though, it doesn't come out in the picture.

And this is the back (done with markers)


And I could not help myself, this is what "Envie Addicts Unite" has done to me, I just HAD to art up the envelope as well. Teehee, it is a padded envelope (bulky) and when my friend said to me she would feel guilty to throw it out I said to keep it. I have no idea how she is going to store it, I would probably use it to store received EAU envies inside...


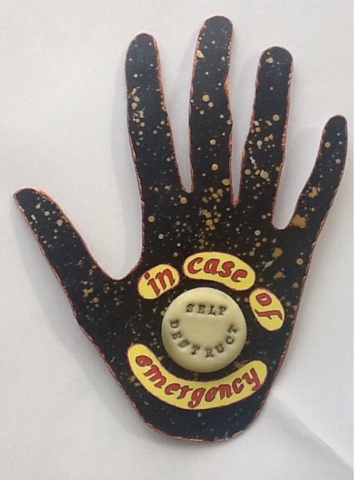
And the other hand I made needs a bit more of an explanation with it. I made it from another friends hand shape. This friend has in the past more than encouraged me to explore my arty side and she also got me started on a major project that will probably keep me busy for another year. 
She writes songs (and probably poetry as well) and her (very) own music, and she also is into Astrology. She likes spiders and in her own way is a doomsday prophet. (I wonder what she is going to make of this des riptioon). All of these themes have found their way onto her hand.

Front


I redid all the webs and the spiders in glitter gel pen, and also the planet notes, but the pictures doesn't do it full justice.

The back is done in acrylics, marker collage and polymer clay...


I have wanted to make her a self destruct button for a loong time, and this one glows in the dark, too! How long will she need to discover that? (Muahahaha!)
I protectively wrapped it into this ( the most telling ingredients list on the back: sugar, syrup, honey, more sugar, some added glucose and then carbohydrates)


And then mailed it in this


Maybe I should mention she lives just down the road from me? Envie Addicts, this is all your fault! ;)


Sunday, 1 May 2016

Tea Bag Art

Hello, everyone. 

Some of you may know that I am actively participating in regular and occasional art swaps on the marvellous website Atcsforall.com. There I was made aware of a new swap that I could not believe at first: Tea Bag Art. That means doing stuff with/to used tea bags! 

My first reaction was disbelief "surely, nobody would..." but alas! As I was searching another of my favourite webpages (Pinterest) for this subject I found out that "somebody would" actually quite a lot of people seem to do it. And as I love new and unusual arty things to try I signed up.

This post is all about my process of handling the very delicate tea bag material and also the FAILS! I was so happy today that I had gotten one tea bag painted successfully, but I will let you find the flaw for yourself later.

There are two basic types of teabags, the flat ones and the folded ones. They seem to be made of slightly different material and in my house they are holding very different sorts of tea. Let's start with the flat kind. The only type of tea I have in those is the regular kind, and a very strong variety that gives the bag a pretty intense stain. I do not leave the bags in for more than 30seconds, otherwise the brew just gets too strong for me.


As you can see I already did some experiments on these. The two on the left are used so you can see the colour is pretty intense. The bag on the top left was drawn on with a fine marker, that worked well but the material is quite rough and even a light usage of the marker can widen gaps in the paper into gaping holes. The big orange stain on its corner is watercolour and it just kept on spreading and spreading. On the bag bottom left I did a kind of reverse technique, I used watercolour first and very sparingly, and later drew around it with the marker, results are not really any better than trial no. 1.

Next up is the folded kind of teabag. In those I have what is called "Yogi Tea" here, a herbal sort of a chai variety.


As you can sea it stains a LOT less, even though the contents was dried inside the bag. When I opened it, the tea inside was stuck to the paper and I could not remove it. So for the next ones I removed the contents while the bag was still very wet and inside a container with water to wash the tea off. The material now has very little to nearly no stain, but the bag is free from residue and intact. 
On the other hand the fabric(?) holds up really well to watercolours and markers, with very little to no spread of colour.


I used the teabag shaped piece of card to predraw the design, then placed it under the bag and drew the outlines. 
I found that while painting in the coloured areas I had to make sure the material was not touching the surface underneath it or the paint would start to go everywhere!
As the bag itself was hardly teastained at all I gave it a nice background with very light watercolours, I might prestain the material with some of the tea from the flat bags.

So now here is the final trial piece, I was a bit disheartened when I spotted my mistake.


So keep in mind when you are using this folded kind: there is a definite FRONT and a definite BACK! 
I am not dissapointed to have to redo this one, I learned some valuable lessons for the tea bags I am sending in to the swap. And maybe this post will help others in avoiding the "pitfalls" I had.

;-)


Sunday, 17 April 2016

One more hand and more...

I have to admit, I love making art hands. I am so glad I saw the art hand swap over on Atcs for all, and that I got accepted into it. The swap was already pretty much full and luckily I got in. Well, you can see the hands I made for the swap in my post from the 28th of March, and then I made more hands in my last post. I have one more finished and the person it was intended for has received it so now I can post it.

I made another Autumn hand for a fabulous trading friend of mine, her art is so wonderful, it took me several weeks to even dare to ask her for a trade. When she accepted I really gave it more than my all to live up to her talent and she assured me by now She was over the moon with what I sent her.However, trading with her has really influenced the way I draw and even the point at which I regard a card as finished and so I wanted to surprise her with a little something.


I tried to make it look as if the tree was coming out of the Cornucopia as well, cause that is where trees come from, isn't it ? ;-)

And this is the back. If you look closely you can probably make out who I made it for.


I could not help it, when I placed it in the large padded envelope I noticed all the arting space on it, and even though it is a yellow envelope, space for art IS space for art...


Of course that is not all I made recently. I also made an art envelope for a partner and I was in a weird mood, so I had my way with a classic painting.


I wrote the adress on the waves on her right hand side. And the back shows it is not really a calm day.


Wednesday, 30 March 2016

Some more hands

I absolutely loved loved loved making the first set of arted up hads from the last post and so of course I made some more. You gals that have jumped over here from EAU have probably already seen them as I uploaded them into my atcsforall gallery, too. I think I really have to stop doing that to keep it more interesting for everybody that reads this and already had a look in that gallery.
And to everybody else: EAU means Envie Addicts Unite and it is an Envie "swap club" where we swap our arted up envies and send them through the postal system so they get the stamps and 'abuse' that only the postal services can provide (only kidding you postal folks out there).

Anyway, here are some more hands, this time I used my twin kids hands, they are only 2 1/2 years old, so I made sure their fingers were together for the template to provide me with more drawing area.I will start with my sons hands.

He likes the moon very much...


And he loves elephants even more...


And now my little daughters hands, she does have a prickly personality...


Yet there is so much time for her to grow...


I think next time I will be posting about my older boys hands, I have started them already and maybe I will do mine and the hubster, too. 


Monday, 28 March 2016

Art hands

It has been a month already (!) since my last post here, so another blog entry is waaay overdue at this stage! The question is only, what do I start with? I have done lots and lots of art, again most is for swaps and I do not want my partners to see what I did ahead of time. 
So I am going to show you some arted up hand outlines I made for a swap, but I already showed them  to the gals taking part in the swap so I am not spoiling anybodys surprise.

The guideline was to use your own hand as template, the fingers could be open or closed, and then art it up. We were asked to please finish it nicely so I painted some acrylic paints in gold shades and silver on the edges, using a different shade for each hand.
I had not done any Trees of Life in quite a while so I started with one and it became a whole year around series, starting with 


Spring


Summer


Autumn


Winter


I used my trusted inktense pencils for most of the artwork, the trees are coloured with Spectrum Noir pencils as they offer more accuracy with the shading. I also used a glitter gel pen for the pumpkin and I added some diluted iridescent medium to the winter hand to make the snow, moon and snowman shimmer and I used some undiluted iridescent medium to make the snowflakes. The winter hand is the only hand that does not have gold on the edge but silver (more wintery).

I love arting up hands and so far I kept going and made some more, using my own and some of my kids hands. But that is material for another blog entry...


Saturday, 27 February 2016

Weird Sun

Todays post is going to be short and painless. Remember I was saying I wanted to use one of my polymer clay faces to make a weird looking sun? Well, here goes...


Monday, 22 February 2016

Valentines 2016

Today I want to share with you all the making of a lot (!) of Valentines I have sent to lots of different people this year. I should explain to the uninitiated that I am not just sending Valentines cards and such to random people, all the recipients are part of an art trading community based in America, so most of the mail went there. We could sign up for sending the Valentines and instead of being assigned a partner we were to send a Valentine to each person that had signed up for it. I admit that a lot more people signed up than I had anticipated and I was very glad I had started work on these in late January. 

If you have not yet got your Valentine, the following could ruin the surprise for you and it is entirely up to you to keep reading!!!


Ok, I did want to make different cards for all but I knew I would probably run into time trouble along the way and so I decided to compromise. I took my chalk pastels (or soft pastels) and drew hearts in different colours all over several sheets of paper. And then I chose a different colour for each paper for the background and cut all into four single cards each.


I then sealed the individual cards with a spray sealer ( yes, I could have done that before I cut them but I had just bought a paper cutter and went a bit mad...), wrapped in individual plastic baggies and then I had to get out my good old sewing machine for these...


And this is how I mailed them, the pic was taken before I had to put a huge green customs sticker on each...


So far I have received two of the beauties that are (hopefully) headed my way, no luck in the mailbox today, though. Ah, nothing beats getting reaquainted with anticipation!